
Microservices là một giải pháp cho phép chia một hệ thống lớn thành một vài các component độc lập về phát triển, test và deploy.
Spring Cloud là một dự án con trong họ nhà Spring, được sử dụng để phát triển các ứng dụng phân tán. Một ứng dụng được gọi là phần tán (Distributed application) khi các phần của nó có thể được phát triển trên các ngôn ngữ khác nhau và được triển khai trên các máy chủ khác nhau. Như vậy, Spring Cloud sinh ra là để làm các hệ thống microservice. Tất cả các dự sán Spring Cloud nên được tạo từ Spring Boot để giảm thiểu các cấu hình phức tạp và dễ cài đặt hơn.
Trong series này, chúng ta sẽ cùng tìm hiểu cách xây dựng một hệ thống microservice bằng Spring Boot và Eureka (một dự án trong Spring Cloud). Phần đầu tiên là tạo các microservice và gateway.
1. Tổng quan
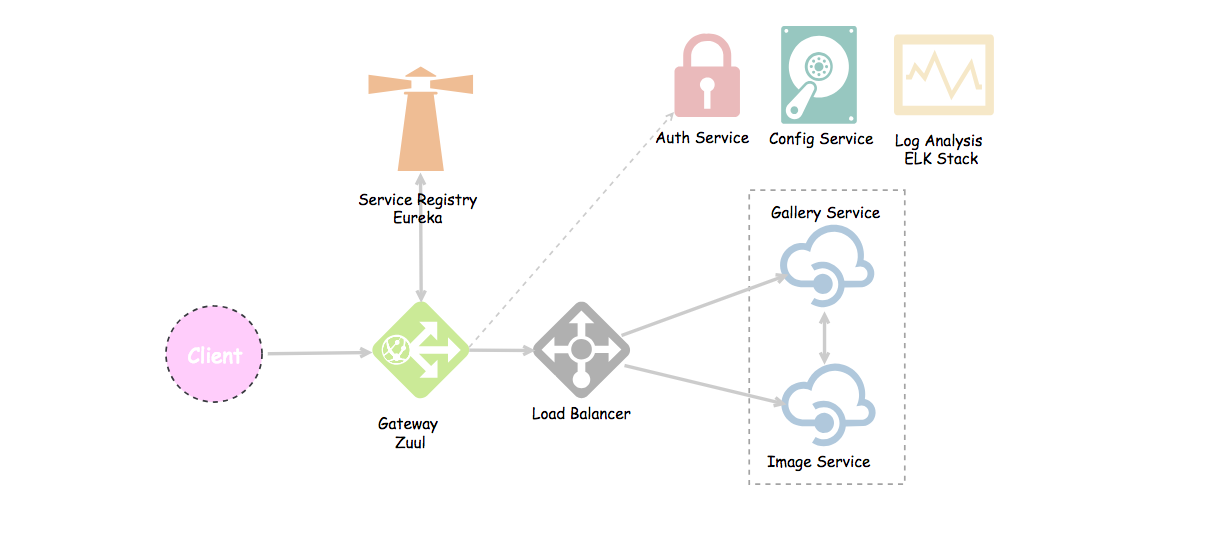
Nhìn vào sơ đồ các thành phần của hệ thống ở trên, chúng ta cần tạo các service registry, image, gallery và một gateway. Gallery service sẽ sử dụng những bức ảnh lấy từ Image service và sắp xếp chúng thành một album ảnh.
Phiên bản Spring Boot mà chúng ta sẽ sử dụng trong serries này là 2.0.0.RELEASE.
<parent>
  <groupId>org.springframework.boot</groupId>
  <artifactId>spring-boot-starter-parent</artifactId>
  <version>2.0.0.RELEASE</version>
  <relativePath/>
</parent>
2. Eureka Server
Đây là một máy chủ dùng để quản lý, đặt tên cho các service, hay còn gọi là service registry. Nhưng tại sao chúng ta lại cần một server để đặt tên cho mỗi service. Lý do:
- Chúng ta không muốn hardcode địa chỉ IP của mỗi microservice. Bạn chẳng bao giờ dùng địa chỉ
64.233.181.99để truy cập vào tranggoogle.com, đúng chứ? - Khi mà các service của chúng ta sử dụng IP động, nó sẽ tự động cập nhật, chúng ta không cần thay đổi code.
Vậy là mỗi service sẽ được đăng ký với Eureka và sẽ ping cho Eureka để đảm bảo chúng vẫn hoạt động. Nếu Eureka server không nhận được bất kỳ thông báo nào từ service thì service đó sẽ bị gỡ khỏi Eureka một cách tự động.
Ok, để tạo Eureka server, chúng ta sẽ dùng Maven để quản lý các dependencies. Lưu ý khác với kiến trúc monolithic, mỗi component trong microservice được dựng một cách độc lập. Do đó chúng ta sẽ tạo mới một project Spring Boot và khai báo file pom.xml có các dependencies Web, Eureka Server và DevTools (tùy chọn):
<dependencies>
    <dependency>
        <groupId>org.springframework.boot</groupId>
        <artifactId>spring-boot-starter-web</artifactId>
    </dependency>
    <dependency>
        <groupId>org.springframework.cloud</groupId>
        <artifactId>spring-cloud-starter-netflix-eureka-server</artifactId>
    </dependency>

    <dependency>
        <groupId>org.springframework.boot</groupId>
        <artifactId>spring-boot-devtools</artifactId>
        <scope>runtime</scope>
    </dependency>
    <dependency>
        <groupId>org.springframework.boot</groupId>
        <artifactId>spring-boot-starter-test</artifactId>
        <scope>test</scope>
    </dependency>
</dependencies>
Tiếp theo, trong file application.properties, chúng ta cần cấu hình một số thứ như sau:
# Give a name to the eureka server

spring.application.name=eureka-server

# default port for eureka server

server.port=8761

# eureka by default will register itself as a client. So, we need to set it to false.

# What's a client server? See other microservices (image, gallery, auth, etc).

eureka.client.register-with-eureka=false

eureka.client.fetch-registry=false
Cuối cùng, trong class main của project, chúng ta sẽ khai báo đây là một Eureka server bằng annotation @EnableEurekaServer:
package io.github.tubean.eureka.server;

import org.springframework.boot.SpringApplication;
import org.springframework.boot.autoconfigure.SpringBootApplication;
import org.springframework.cloud.netflix.eureka.server.EnableEurekaServer;

@SpringBootApplication
@EnableEurekaServer
public class ServerApplication {

    public static void main(String[] args) {
        SpringApplication.run(ServerApplication.class, args);
    }

}
Đơn giản thế thôi, đi tiếp đến những service về nghiệp vụ nào 😄
3. Image Service
Các Eureka client service là một service độc lập trong kiến trúc microservice. Mỗi client service chỉ thực hiện duy nhất một nghiệp vụ nào đó trong hệ thống như thanh toán, tài khoản, thông báo, xác thực, cấu hình,… Chúng ta sẽ xây dựng image service như một nguồn để chứa và cung cấp các bức ảnh, mỗi bức ảnh sẽ có id, title và địa chỉ url. Chỉ đơn giản như vậy thôi.
Ok, cũng như Eureka Server, chúng ta sẽ tạo một project Spring Boot mới nhưng sử dụng Eureka Client trong file pom.xml:
<dependencies>
    <dependency>
        <groupId>org.springframework.boot</groupId>
        <artifactId>spring-boot-starter-web</artifactId>
    </dependency>
    <dependency>
        <groupId>org.springframework.cloud</groupId>
        <artifactId>spring-cloud-starter-netflix-eureka-client</artifactId>
    </dependency>
    <dependency>
        <groupId>org.springframework.boot</groupId>
        <artifactId>spring-boot-starter-data-rest</artifactId>
    </dependency>

    <dependency>
        <groupId>org.springframework.boot</groupId>
        <artifactId>spring-boot-devtools</artifactId>
        <scope>runtime</scope>
    </dependency>
    <dependency>
        <groupId>org.springframework.boot</groupId>
        <artifactId>spring-boot-starter-test</artifactId>
        <scope>test</scope>
    </dependency>
</dependencies>
Trong file appication.properties chúng ta sẽ ghi lại địa chỉ của Eureka server:
# serivce name

spring.application.name=image-service

# port

server.port=8200

# eureka server url

eureka.client.service-url.default-zone=http://localhost:8761/eureka
Sau đó để chỉ cho Spring Boot biết đây là một Eureka client, chúng ta dùng annotation @EnableEurekaClient trong class main:
package io.github.tubean.eureka.image;

import org.springframework.boot.SpringApplication;
import org.springframework.boot.autoconfigure.SpringBootApplication;
import org.springframework.cloud.netflix.eureka.EnableEurekaClient;

@SpringBootApplication
@EnableEurekaClient
public class ImageApplication {

    public static void main(String[] args) {
        SpringApplication.run(ImageApplication.class, args);
    }

}
Bây giờ để image service có thể expose data ra ngoài, chúng ta cần có các endpoint đúng không? Tương tự một RESTful web service, chúng ta sẽ tạo một entity định nghĩa cấu trúc chuỗi JSON và một controller điều hướng:
- Image.java
package io.github.tubean.eureka.image.entity;

public class Image {
    private Integer id;
    private String title;
    private String url;

    public Image(Integer id, String title, String url) {
        this.id = id;
        this.title = title;
        this.url = url;
    }

    public Integer getId() {
        return id;
    }

    public void setId(Integer id) {
        this.id = id;
    }

    public String getTitle() {
        return title;
    }

    public void setTitle(String title) {
        this.title = title;
    }

    public String getUrl() {
        return url;
    }

    public void setUrl(String url) {
        this.url = url;
    }
}
- HomeController.java
package io.github.tubean.eureka.image.controller;

import io.github.tubean.eureka.image.entity.Image;
import org.springframework.beans.factory.annotation.Autowired;
import org.springframework.core.env.Environment;
import org.springframework.web.bind.annotation.RequestMapping;
import org.springframework.web.bind.annotation.RestController;

import java.util.Arrays;
import java.util.List;

@RestController
@RequestMapping("/")
public class HomeController {
   @Autowired
  private Environment env;

   @RequestMapping("/")
   public String home() {
      // This is useful for debugging
 // When having multiple instance of image service running at different ports. // We load balance among them, and display which instance received the request.  return "Hello from Image Service running at port: " + env.getProperty("local.server.port");
   }

   @RequestMapping("/images")
   public List<Image> getImages() {
      List<Image> images = Arrays.asList(
         new Image(1, "Treehouse of Horror V", "https://www.imdb.com/title/tt0096697/mediaviewer/rm3842005760"),
         new Image(2, "The Town", "https://www.imdb.com/title/tt0096697/mediaviewer/rm3698134272"),
         new Image(3, "The Last Traction Hero", "https://www.imdb.com/title/tt0096697/mediaviewer/rm1445594112"));
      return images;
   }
}
4. Gallery Service
Các Eureka client service có thể là một REST client dùng để cung cấp data cho một service khác (REST API service). Do đó, trong hệ thống của chúng ta, gallery service sẽ gọi đến image service thông qua các endpoint mà chúng ta đã tạo ra ở trên, và từ đó sẽ get ra một list ảnh để tạo ra một album. Để gọi đến một service từ một REST client, chúng ta có thể sử dụng:
RestTemplate: Đây là một object cho phép gửi request đến một REST API service.FeignClient: hoạt động như một proxy, cung cấp các giải pháp khác cho RestTemplate.
Và cả 2 cách thì cân bằng tải đều có thể áp dụng.
Cân bằng tải (Load balancing) là gì? Nếu như có nhiều hơn một instance của một service chạy trên các port khác nhau thì chúng ta cần cân bằng những request giữa tất cả các instance đó. Trong điều kiện lý tưởng thì cân bằng tải sẽ giúp các port nhận số lượng request tương đương nhau.
Tương tự Image service, chúng ta khai báo file pom.xml cho Gallery service. Và trong application.properties, port sử dụng sẽ khác với Image service:
spring.application.name=gallery-service
server.port=8100
eureka.client.service-url.default-zone=http://localhost:8761/eureka
Trong class main, bên cạnh annotation @EnableEurekaClient, chúng ta sẽ cần tạo thêm một bean cho RestTemplate dùng để gọi đến image service.
package io.github.tubean.eureka.gallery;

import org.springframework.boot.SpringApplication;
import org.springframework.boot.autoconfigure.SpringBootApplication;
import org.springframework.cloud.client.loadbalancer.LoadBalanced;
import org.springframework.cloud.netflix.eureka.EnableEurekaClient;
import org.springframework.context.annotation.Bean;
import org.springframework.context.annotation.Configuration;
import org.springframework.web.client.RestTemplate;

@SpringBootApplication
@EnableEurekaClient
public class GalleryServiceApplication {

    public static void main(String[] args) {
        SpringApplication.run(GalleryServiceApplication.class, args);
    }

}

@Configuration
class RestTemplateConfig {

    // Create a bean for restTemplate to call services
  @Bean
 @LoadBalanced // Load balance between service instances running at different ports.
  public RestTemplate restTemplate() {
        return new RestTemplate();
    }
}
Đừng quên entity và controller:
- Gallery.java
package io.github.tubean.eureka.gallery.entity;

import java.util.List;

public class Gallery {
    private Integer id;
    private List<Object> images;

    public Gallery(Integer id, List<Object> images) {
        this.id = id;
        this.images = images;
    }

    public Gallery() {
    }

    public Integer getId() {
        return id;
    }

    public void setId(Integer id) {
        this.id = id;
    }

    public List<Object> getImages() {
        return images;
    }

    public void setImages(List<Object> images) {
        this.images = images;
    }
}
- HomeController.java
package io.github.tubean.eureka.gallery.controller;

import io.github.tubean.eureka.gallery.entity.Gallery;
import org.springframework.beans.factory.annotation.Autowired;
import org.springframework.core.env.Environment;
import org.springframework.web.bind.annotation.PathVariable;
import org.springframework.web.bind.annotation.RequestMapping;
import org.springframework.web.bind.annotation.RestController;
import org.springframework.web.client.RestTemplate;

import java.util.List;

@RestController
@RequestMapping("/")
public class HomeController {
   @Autowired
  private RestTemplate restTemplate;

   @Autowired
  private Environment env;

   @RequestMapping("/")
   public String home() {
      // This is useful for debugging
 // When having multiple instance of gallery service running at different ports. // We load balance among them, and display which instance received the request.  return "Hello from Gallery Service running at port: " + env.getProperty("local.server.port");
   }

   @RequestMapping("/{id}")
   public Gallery getGallery(@PathVariable final int id) {
      // create gallery object
  Gallery gallery = new Gallery();
      gallery.setId(id);

      // get list of available images
 List<Object> images = restTemplate.getForObject("http://image-service/images/", List.class);
      gallery.setImages(images);

      return gallery;
   }

   // -------- Admin Area --------
 // This method should only be accessed by users with role of 'admin' // We'll add the logic of role based auth later  @RequestMapping("/admin")
   public String homeAdmin() {
      return "This is the admin area of Gallery service running at port: " + env.getProperty("local.server.port");
   }
}
Ok, đến đây chúng ta cần chú ý khi sử dụng restTemplate thì trong Eureka Server đã đặt tên cho các service nên chúng ta sẽ sử dụng tên của chúng (image-service thay vì localhost:port) nhằm mục đích sử dụng cân bằng tải.
5. Gateway - Zuul
Khi chúng ta gọi đến bất kỳ service nào từ browser, chúng ta không thể gọi trực tiếp bằng tên của chúng như ở trên Gallery server đã làm bởi vì những tên service như vậy phải được bí mật và chỉ sử dụng trong nội bộ các service với nhau.
Nếu chúng ta có nhiều instance của một service, mỗi instance lại sử dụng một port khác nhau. Vậy làm thế nào chúng ta có thể gọi tất cả các service từ browser và phân tán những request đến các instance đó thông qua các cổng khác nhau? Câu trả lời là sử dụng một Gateway.
Một gateway là một entry point đơn trong hệ thống, được dùng để handle các request bằng cách định tuyến chúng đến các service tương ứng. Nó cũng có thể được dùng để xác thực, giám sát và làm nhiều việc khác.
Zuul là gì?
Nó là một proxy, gateway và một lớp trung gian giữa user và các service của bạn. Eureka server đã giải quyết vấn đề đặt tên cho từng service thay vì dùng địa chỉ IP của chúng. Tuy nhiên một service vẫn có thể có nhiều instance và chúng sẽ chạy trên các cổng khác nhau nên nhiệm vụ của Zuul sẽ là:
- Map giữa một prefix path (/gallery/**) và một service (gallery-service). Nó sử dụng Euraka server để định tuyến các service được request.
- Nó giúp cân bằng tải giữa các instance của một service.
- Còn gì nữa? Chúng ta có thể dùng nó để filter request, thêm xác thực,…
Trong file pom.xml của project Zuul, chúng ta sẽ có các dependencies: Web, Eureka Client và Zuul:
<dependencies>
    <dependency>
        <groupId>org.springframework.boot</groupId>
        <artifactId>spring-boot-starter-web</artifactId>
    </dependency>
    <dependency>
        <groupId>org.springframework.cloud</groupId>
        <artifactId>spring-cloud-starter-netflix-zuul</artifactId>
    </dependency>
    <dependency>
        <groupId>org.springframework.cloud</groupId>
        <artifactId>spring-cloud-starter-netflix-eureka-client</artifactId>
    </dependency>
    <dependency>
        <groupId>org.springframework.boot</groupId>
        <artifactId>spring-boot-devtools</artifactId>
        <scope>runtime</scope>
    </dependency>
    <dependency>
        <groupId>org.springframework.boot</groupId>
        <artifactId>spring-boot-starter-test</artifactId>
        <scope>test</scope>
    </dependency>
</dependencies>
Điều đáng nói là Zuul hoạt động như một Eureka client. Vì vậy chúng ta có thể đặt tên cho nó, chỉ định port và đường dẫn đến Eureka server như các client trước đó.
server.port=8762

spring.application.name=zuul-server

eureka.client.service-url.default-zone=http://localhost:8761/eureka/

# A prefix that can added to beginning of all requests.

#zuul.prefix=/api

# Disable accessing services using service name (i.e. gallery-service).

# They should be only accessed through the path defined below.

zuul.ignored-services=*

# Map paths to services

zuul.routes.gallery-service.path=/gallery/**

zuul.routes.gallery-service.service-id=gallery-service
Cuối cùng là thêm các annotation để thông báo đây là Zuul và Eureka client:
package io.github.tubean.eureka.zuulserver;

import org.springframework.boot.SpringApplication;
import org.springframework.boot.autoconfigure.SpringBootApplication;
import org.springframework.cloud.netflix.eureka.EnableEurekaClient;
import org.springframework.cloud.netflix.zuul.EnableZuulProxy;

@SpringBootApplication
@EnableEurekaClient // It acts as a eureka client
@EnableZuulProxy // Enable Zuul
public class ZuulServerApplication {

    public static void main(String[] args) {
        SpringApplication.run(ZuulServerApplication.class, args);
    }

}
6. Testing
Ok, như vậy là chúng ta đã dựng xong bộ khung cho hệ thống microservice. Chúng ta đã có một service discovery (Eureka server), hai service (Image và Gallery), một cổng gateway (Zuul) và giờ chỉ cần start chúng lên.
Để chạy nhiều instance thì trong Eclipse, bạn vào Run -> Configurations/Arguments -> VM options và thêm
-Dsever.port=8300
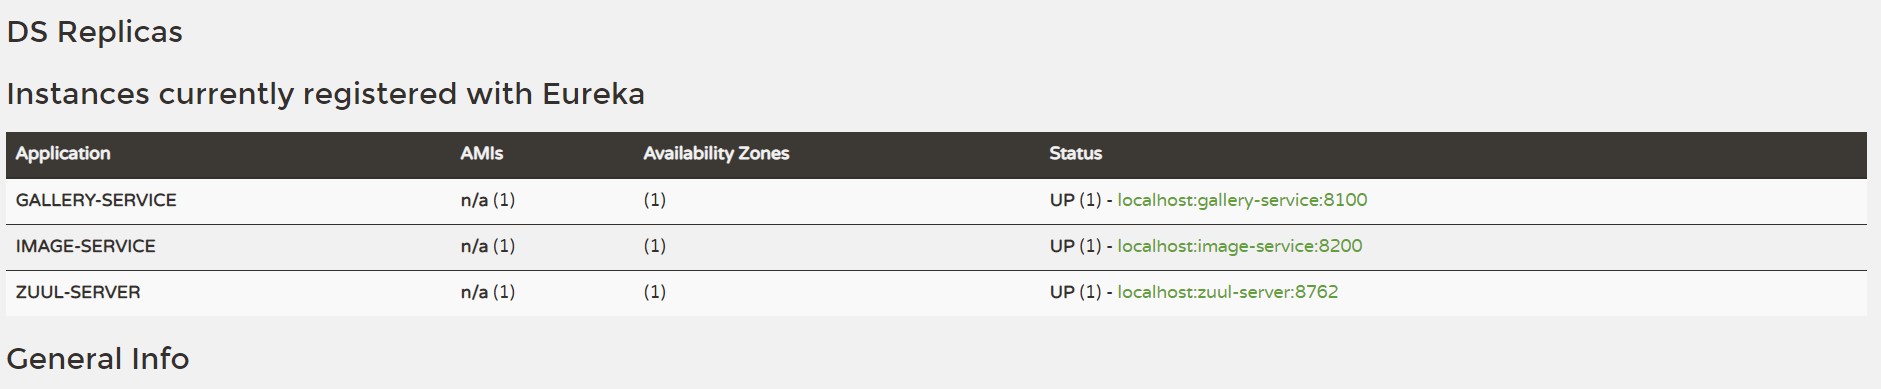
Để kiểm tra ứng dụng của chúng ta, hãy truy cập vào localhost:8761, đây là cổng của Eureka Server. Và bạn sẽ thấy các server đang chạy như sau:
 Sau đó hãy gọi tiếp đến gallery service bằng đường dẫn
 localhost:8762/gallery. Chúng ta sẽ nhận được message như sau:
>Hello from Gallery Service running at port: 8100
Nếu dùng multiple instance, bạn sẽ nhận được 2 dòng như trên với 2 cổng khác nhau.
Tiếp theo chúng ta gọi đến service Image thông qua Gallery bằng đường dẫn localhost:8762/gallery/1. Kết quả nhận được sẽ là:
// 20181218230927
// http://localhost:8762/gallery/1

{
  "id": 1,
  "images": [
    {
      "id": 1,
      "title": "Treehouse of Horror V",
      "url": "https://www.imdb.com/title/tt0096697/mediaviewer/rm3842005760"
    },
    {
      "id": 2,
      "title": "The Town",
      "url": "https://www.imdb.com/title/tt0096697/mediaviewer/rm3698134272"
    },
    {
      "id": 3,
      "title": "The Last Traction Hero",
      "url": "https://www.imdb.com/title/tt0096697/mediaviewer/rm1445594112"
    }
  ]
}
Kết thúc phần đầu tiên ở đây, ở phần tiếp theo chúng ta sẽ tìm hiểu cách để xác thực user bằng JWT.
https://tubean.github.io/2018/12/microservice-springboot-eureka-part2/
