
1- Apache POI là gì?
Khi lập trình với bất cứ hệ thống nào thì việc thao tác với các file excel luôn là điều bắt buộc mọi developer phải nắm được. Và để làm việc hiệu quả với excel file trong java thì tôi xin giới thiệu thư viện Apache POI trong bài viết này. POI là viết tắt của Poor Obfuscation Implementation, đó là một thư viện mã nguồn mở của Java, được cung cấp bởi Apache giúp chúng ta làm việc với các tài liệu của Microsoft như Word, Excel, PowerPoint…
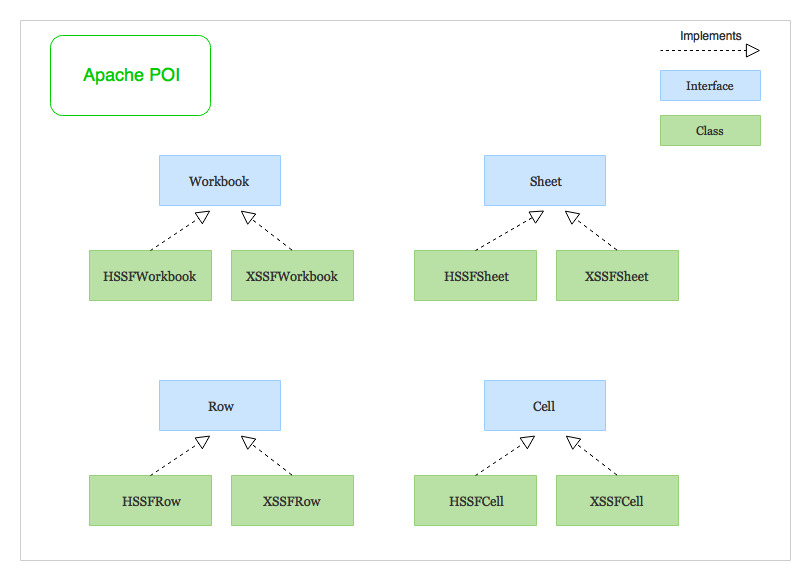
2. Các thuật ngữ trong Apache POI
Để thao tác với các file Excel thì POI cung cấp cho chúng ta các khái niệm chính sau:
Workbook: Đây là khái niệm đại diện cho một bảng tính, hay một file Excel.Sheet: tương đương với các sheet trong file Excel, một workbook có thể có một hoặc nhiều sheet.Row: đơn vị hàng trong một bảng tínhCell: đại diện cho một cột trong bảng tính. Như vậy mỗi một ô trong file Excel sẽ được biểu diễn bằng một row và một cell.
Để làm việc với Excel thì chúng ta không cần quan tâm đến tất cả các class trong thư viện POI mà chỉ cần để ý đến 2 loại sau:
- Các class có tiếp đầu ngữ là HSSF (Horrible SpreadSheet Format) : Các class giúp đọc và ghi file dang Microsoft Excel (XLS - dạng excel cũ). Ví dụ: HSSFWorkbook, HSSFSheet, HSSFCellStyle,…
- Các class có tiếp đầu ngữ là XSSF (XML SpereadSheet Format) : Đọc và ghi định dạng file Open Office XML (XLSX - dạng excel mới).
3. Tạo thử một file Excel
Nếu bạn sử dụng Maven thì cần thêm dependency của POI vào file pom.xml:
<!-- Used to work with the older excel file format - `.xls` -->
<!-- https://mvnrepository.com/artifact/org.apache.poi/poi -->
<dependency>
    <groupId>org.apache.poi</groupId>
    <artifactId>poi</artifactId>
    <version>3.17</version>
</dependency>

<!-- Used to work with the newer excel file format - `.xlsx` -->
<!-- https://mvnrepository.com/artifact/org.apache.poi/poi-ooxml -->
<dependency>
    <groupId>org.apache.poi</groupId>
    <artifactId>poi-ooxml</artifactId>
    <version>3.17</version>
</dependency>
Còn Gradle thì thêm vào build.gradle:
compile "org.apache.poi:poi:3.17"	     // For `.xls` files
compile "org.apache.poi:poi-ooxml:3.17"	 // For `.xlsx` files
Trước tiên, ta tạo một class model để có thể ghi các ra các row theo một List data:
public class Employee {
    private String name;
    private String email;
    private Date dateOfBirth;
    private double daysOfWork;
    private double salaryPerDay;
    private Double totalSalary;

    public Employee(String name, String email, Date dateOfBirth, double daysOfWork, double salaryPerDay, Double totalSalary) {
        this.name = name;
        this.email = email;
        this.dateOfBirth = dateOfBirth;
        this.daysOfWork = daysOfWork;
        this.salaryPerDay = salaryPerDay;
        this.totalSalary = totalSalary;
    }
    // Getter and Setter
Tiếp đến chuẩn bị data raw để ghi vào file excel:
public class ExcelWriter {
    private static String[] columns = {"Name", "Email", "Date of birth", "Days of work", "Salary Per Day", "Total Salary"};
    private static List<Employee> employees = new ArrayList<>();

    // Initializing employees data to insert into the excel file
  static {
        Calendar dateOfBirth = Calendar.getInstance();
        dateOfBirth.set(1995, 0, 8); // 0 means January
  employees.add(new Employee("Tubean", "tubean@github.com", dateOfBirth.getTime(), 22d, 100d, null));
        dateOfBirth.set(1998, 2, 15);
        employees.add(new Employee("Quynh", "vivichan@gmail.com", dateOfBirth.getTime(), 21d, 120d, null));
    }
}
Sau các bước chuẩn bị data, chúng ta tạo một workbook:
// Create a Workbook
Workbook workbook = new XSSFWorkbook(); // new HSSFWorkbook() for generating `.xls` file
Có workbook rồi chúng ta tạo tiếp một sheet trong đó:
// Create a Sheet
Sheet sheet = workbook.createSheet("Employee");
Có thể thêm một chút màu sắc font bạt cho đẹp mắt:
Font headerFont = workbook.createFont();
headerFont.setBold(true);
headerFont.setFontHeightInPoints((short) 14);
headerFont.setColor(IndexedColors.RED.getIndex());

// Create a CellStyle with the font
CellStyle headerCellStyle = workbook.createCellStyle();
headerCellStyle.setFont(headerFont);
Sau đó chúng ta tạo row đầu tiên chứa các tiêu đề của các cột:
// Create a Row
Row headerRow = sheet.createRow(0);

// Create cells
for (int i = 0; i < columns.length; i++) {
    Cell cell = headerRow.createCell(i);
    cell.setCellValue(columns[i]);
    cell.setCellStyle(headerCellStyle);
}
Do trong phần model của chúng ta có loại dữ liệu khác đặc biệt là Date (dateOfBirth) nên chúng ta cần một format cho nó:
// Create Cell Style for formatting Date
CellStyle dateCellStyle = workbook.createCellStyle();
dateCellStyle.setDataFormat(createHelper.createDataFormat().getFormat("dd-MM-yyyy"));
Tiếp đến là công việc chính, set data vào các ô trong file excel:
// Create Other rows and cells with employees data
int rowNum = 1;
for (Employee employee : employees) {
    Row row = sheet.createRow(rowNum++);

    // Employee's name (Column A)
  row.createCell(0)
            .setCellValue(employee.getName());

    // Employee's email (Column B)
  row.createCell(1)
            .setCellValue(employee.getEmail());

    // Employee's date of birth (Column C)
  Cell dateOfBirth = row.createCell(2);
    dateOfBirth.setCellValue(employee.getDateOfBirth());
    dateOfBirth.setCellStyle(dateCellStyle);

    // Employee's days of Work (Column D)
  row.createCell(3, CellType.NUMERIC)
            .setCellValue(employee.getDaysOfWork());

    // Employee's salary per day (Column E)
  row.createCell(4, CellType.NUMERIC)
            .setCellValue(employee.getSalaryPerDay());

    // Employee's total salary (Column F = D * E)
  String formula = "D" + rowNum + " * E" + rowNum;
    row.createCell(5, CellType.FORMULA)
            .setCellFormula(formula);
}
Chú ý rằng cột cuối cùng ta dùng công thức để tính tổng lương của mỗi nhân viên nên CellType ở đây sẽ là FORMULA.
Cuối cùng là ghi tất cả ra một file Excel thật và kết thúc việc tạo một file Excel:
// Write the output to a file
FileOutputStream fileOut = new FileOutputStream("employee.xlsx");
workbook.write(fileOut);
fileOut.close();

// Closing the workbook
workbook.close();
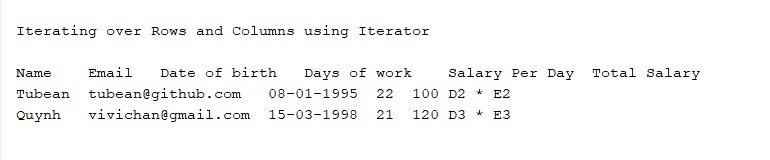
Nội dung file employee.xlsx sẽ như sau:

4. Đọc một file Excel như thế nào
Để đọc một file Excel có sẵn, đầu tiên chúng ta cũng tạo một workbook cho file đó:
  // Creating a Workbook from an Excel file (.xls or .xlsx)
  Workbook workbook = WorkbookFactory.create(new File("./employee.xlsx");
Duyệt các sheet trong một workbook:
  Iterator<Sheet> sheetIterator = workbook.sheetIterator();
  System.out.println("Retrieving Sheets using Iterator");
  while (sheetIterator.hasNext()) {
    Sheet sheet = sheetIterator.next();
    System.out.println("=> " + sheet.getSheetName());
  }
Vì trong file excel ta vừa tạo chỉ có một sheet nên chúng ta sẽ get nó ra như sau:
  // Getting the Sheet at index zero
  Sheet sheet = workbook.getSheetAt(0);
Để duyệt các row trong sheet, ta làm như sau:
  // Create a DataFormatter to format and get each cell's value as String
  DataFormatter dataFormatter = new DataFormatter();
  System.out.println("\n\nIterating over Rows and Columns using Iterator\n");
  Iterator<Row> rowIterator = sheet.rowIterator();
  while (rowIterator.hasNext()) {
    Row row = rowIterator.next();

    // Now let's iterate over the columns of the current row
    Iterator<Cell> cellIterator = row.cellIterator();

    while (cellIterator.hasNext()) {
      Cell cell = cellIterator.next();
      String cellValue = dataFormatter.formatCellValue(cell);
      System.out.print(cellValue + "\t");
    }
    System.out.println();
  }
Sau khi duyệt xong nhớ đóng workbook lại:
  // Closing the workbook
  workbook.close();
Màn hình console sẽ trông như sau:
Từ đây ta có thể nhận thấy đối với kiểu là FORMULA thì khi in ra chúng ta sẽ nhận được công thức của field đó chứ không phải giá trị cuối cùng. Để nhận các giá trị cuối cùng của field thì chúng ta viết thêm hàm sau:
private static Object getCellValue(Cell cell, FormulaEvaluator evaluator) {
  CellValue cellValue = evaluator.evaluate(cell);
  switch (cellValue.getCellTypeEnum()) {
    case BOOLEAN:
      return cellValue.getBooleanValue();
    case NUMERIC:
      return cellValue.getNumberValue();
    case STRING:
      return cellValue.getStringValue();
    case BLANK:
      return "";
    case ERROR:
      return cellValue.getError(cell.getErrorCellValue()).getStringValue();
    // CELL_TYPE_FORMULA will never happen
    case FORMULA:
      default:
        return null;
  }
}
Với một cell có kiểu FORMULA bạn có thể in ra công thức của nó và sử dụng FormulaEvaluator để tính toán giá trị của ô cho bởi công thức đó.
Sau đó sửa lại đoạn duyệt row như sau:
  // Getting the evaluator
  FormulaEvaluator evaluator = workbook.getCreationHelper().createFormulaEvaluator();

  System.out.println("\n\nIterating over Rows and Columns using Iterator\n");
  Iterator<Row> rowIterator = sheet.rowIterator();
  while (rowIterator.hasNext()) {
    Row row = rowIterator.next();

    // Now let's iterate over the columns of the current row
    Iterator<Cell> cellIterator = row.cellIterator();
    while (cellIterator.hasNext()) {
      Cell cell = cellIterator.next();
      System.out.print(getCellValue(cell,evaluator) + "\t");
    }
    System.out.println();
  }
Kết quả nhận được sẽ như sau:

5. Chỉnh sửa một file Excel
Để sửa một file Excel thì chúng ta cũng làm tương tự đọc một file Excel. Đầu tiên là tạo một workbook cho nó và một sheet tương ứng:
 Workbook workbook = WorkbookFactory.create(new File("./employee.xlsx");
// Get Sheet at index 0
 Sheet sheet = workbook.getSheetAt(0);
Xác định vị trí cần update lại và định vị nó. Cần chú ý nếu vị trí cần update chưa được tạo thì cần khởi tạo field đó trước, nếu không chương trình sẽ throw một Exception:
// Get Row at index 2
Row row = sheet.getRow(2);

Cell cell;
// Create the cell if it doesn't exist
if (row.getCell(9) == null) {
    cell = row.createCell(9);
} else {
    cell = row.getCell(9);
}
Update lại định dạng và giá trị của field đó:
// Update the cell's value
cell.setCellType(CellType.STRING);
cell.setCellValue("Updated Value");
Output ra một file Excel khác và đóng workbook:
// Write the output to the file
FileOutputStream fileOut = new FileOutputStream("modifier-employee.xlsx");
workbook.write(fileOut);
fileOut.close();

// Closing the workbook
workbook.close();
Sourcode
https://github.com/tubean/apache-poi-tutorial.git
Tham khảo
https://www.callicoder.com/java-write-excel-file-apache-poi/ https://www.callicoder.com/java-read-excel-file-apache-poi/
